Microsoft Purview Compliance Portal Alerts Dashboard – Implementing Microsoft Purview data loss prevention (DLP)

The easiest place to view DLP alerts is on the Alerts dashboard, located in the Microsoft Purview compliance portal under Data loss prevention. Figure 11.26 depicts an alert that was generated based on a DLP policy using a template to detect personal information, such as social security numbers:

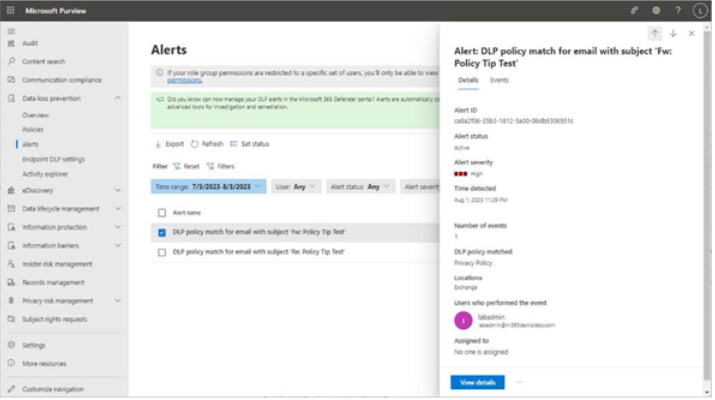
Figure 11.26 – Viewing a DLP alert

You can view more details about the alert by selecting the View details button at the bottom of the flyout. The detail view of an alert displays a number of fields on the Overview tab, such as a plain-text summary of the event, actor details (who did it), the policy that was matched, and the corresponding rule and sensitive information types inside the rule, basic information about the alert, such as the severity and time detected, as well as other alerts related to the user or actor. See Figure 11.27:

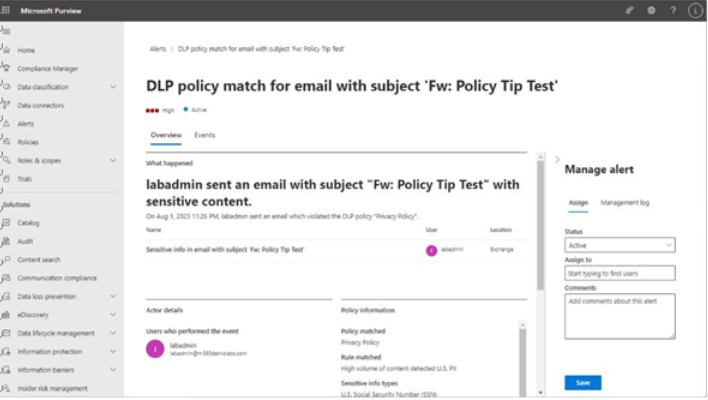
Figure 11.27 – Alert detail page

On the Manage alert pane, you can update the status of a particular DLP event. When first detected, the alert is set to Active. You can select additional statuses such as Investigating, Dismissed, or
Resolved. Updating the status in the Alerts dashboard to Investigating will set the corresponding event’s status to In Progress in the Microsoft 365 Defender incident. Updating the alert status to either Dismissed or Resolved will set the corresponding event’s status to Resolved in the Microsoft 365 Defender incident.

Note
While setting the alert’s status to Dismissed or Resolved in the compliance portal will update the alert’s status to Resolved in the Microsoft 365 Defender portal, setting an alert’s status to Dismissed will also result in the classification in Microsoft 365 Defender being set toFalse positive.

Selecting the Events tab on the alert detail page will show much of the same information but arranged in a different order. New data presented, however, includes additional information about actors and intended recipients, classifiers or sensitive info types used to match content, and the context of the data inside the file or message that triggered the alert.

If you’ve configured a policy to allow user override and the user exercised that option, you can see that data here as well, along with any business justification text that was submitted, as shown in Figure 11.28:

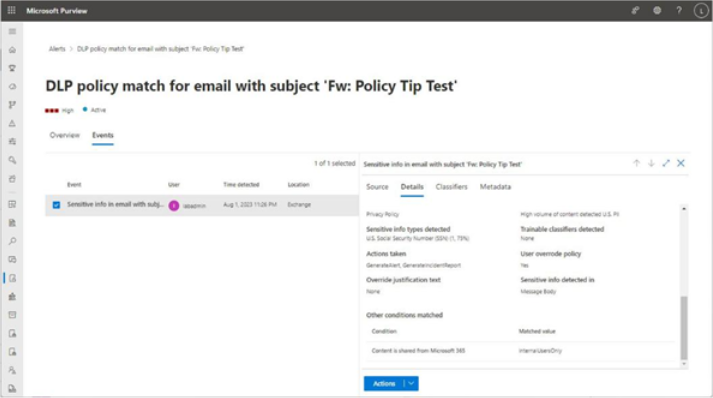
Figure 11.28 – Event detail view of an alert

If you have configured encryption for the items matching the DLP policy, the Source tab may display a warning that the content is encrypted, prompting you to download the file or message in order to view it. However, the Classifiers tab will show examples of content that matches the policy rules. It’s important to only delegate compliance-related roles to individuals your organization trusts to address issues arising from viewing potentially sensitive information. The Metadata tab will show the underlying data for the policy match conditions and will also include the matched content values.

On the Actions tab for an event, you can choose to download the item or mark it as Not a match.

If you select Not a match, you have the option of submitting a redacted sample to Microsoft to help improve the accuracy of scan detections. See Figure 11.29:

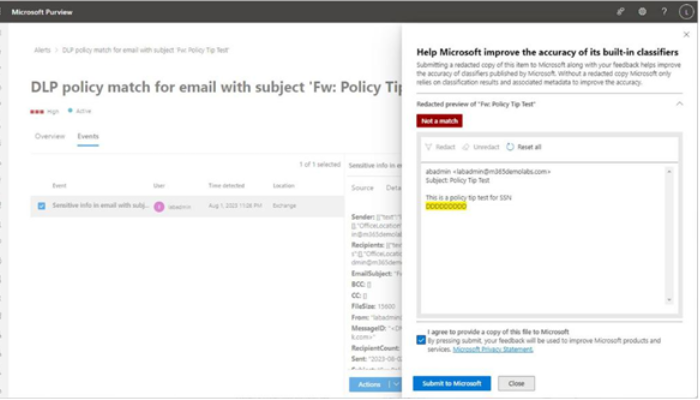
Figure 11.29 – Submitting a redacted false positive sample to Microsoft

While this section specifically covers the DLP view of the Alerts dashboard, the broader compliance portal Alerts view is the same but also includes compliance events from sources besides DLP. The management tasks, item details, and interfaces are the same.

Exchange Online, SharePoint Online, OneDrive for Business, and Teams – Implementing Microsoft Purview data loss prevention (DLP)-2

  1. When editing the DLP content matching rules, you can add sensitive information types and trainable classifiers to groups, as well as adjust the confidence and instance count requirements. By default, objects are joined with OR conditions (Any of these), but you can also set the join criteria to AND (All of these) to create more stringent requirements for detecting data. See Figure 11.6:
This image has an empty alt attribute; its file name is %E5%9B%BE%E7%89%87-24.png

Figure 11.6 – Editing a DLP match rule

  1. Additional rule settings that you can modify from this page include alert notifications as well as allowing or prohibiting override conditions. If configuring aggregated alert thresholds, you can select the Send alert when the volume of matched activities reaches a threshold radio button and then set numeric values corresponding to the minimum number of instances or detections to trigger an alert and what the monitored time period is.
  2. Click Save once you’ve finished editing the rule conditions.
  3. On the Info to protect subpage, click Next.
  4. On the Protection actions page, as shown in Figure 11.7, determine which options to enable.

Exam Tip
If you are customizing a default policy template (as opposed to creating an advanced DLP rule), you will not be able to select Restrict access or encrypt the content in Microsoft 365 locations. That feature is only configurable inside an advanced DLP rule at this time.

This image has an empty alt attribute; its file name is %E5%9B%BE%E7%89%87-23.png

Figure 11.7 – Configuring protection actions

  1. For any of the supported options, you can customize the policy tip, email, and alert notifications. When you’re finished, click Next.
  2. On the Customize access and override settings subpage, as shown in Figure 11.8, edit any options. You may not be able to select options on this page depending on what locations or other options have selected. Auditing or restricting activities on devices, for example, is only available if you have the Devices location enabled for the policy.
This image has an empty alt attribute; its file name is %E5%9B%BE%E7%89%87-22.png

Figure 11.8 – Customize access and override settings

  1. On the Policy mode page, choose the setting for policy enablement. You can choose Test it out first (sometimes referred to as Audit mode), Turn it on right away, or Keep it off. Click Next when you’re finished.
  2. On the Finish page, review the policy settings. Edit them if necessary, and then click Submit to configure the policy.

After choosing to turn on a policy, it may take up to an hour to be enforced across your tenant.

Power BI
DLP for Power BI includes many of the same features as standard policies, with the following exceptions and caveats:

• When creating a policy, you can only select the Custom category and policy template.
• You can only select the Power BI location in the policy. You cannot configure other locations in the same policy.
• DLP actions are only supported in workspaces hosted in Premium capacities.
• You cannot use trainable classifiers to identify data.

All other features and capabilities are supported.

Exchange Online, SharePoint Online, OneDrive for Business, and Teams – Implementing Microsoft Purview data loss prevention (DLP)-1

DLP policies are used in the following contexts for core Microsoft 365 workloads:

• Exchange Online: Apply controls or restrictions to messages as they are sent or received by individuals in the organization.

• SharePoint Online and OneDrive for Business: Restrict sensitive content as it is added to a sharing invitation.

• Teams: Restrict sensitive content as it is entered into a chat or channel message.

• Devices: Protect content on endpoint devices. This option requires additional configuration.

• On-premises file servers: Protect content in connected on-premises repositories. This option requires additional configuration.

To configure a workload DLP policy, follow these steps:

  1. Navigate to the Microsoft Purview compliance portal (https://compliance.microsoft. com).
  2. Under Solutions, expand Data loss prevention and then select Policies.
  3. Click Create policy. See Figure 11.1:

Figure 11.1 – Microsoft Purview compliance policies page

  1. Choose whether to use one of the built-in templates or to create a new custom policy.

Built-in templates are broken into categories such as Enhanced (various international legislation, finance, or privacy regulations, which utilize trainable classifiers to extend detection capabilities), Financial (international financial data types), Medical and health (healthcare legislation, terms, and personal information), and Privacy (international privacy regulations or legislation). You can only choose one template; if you want to include more than one template data type, you’ll need to select Custom and add the sensitive information types or other classifiers manually.

  1. Click Next when the policy type has been selected. See Figure 11.2:

Figure 11.2 – Selecting a template or policy type

  1. On the Name page, enter a value to identify your policy. Click Next.
  2. On the Admin units page, as shown in Figure 11.3, choose whether the DLP policy will apply to the whole organization or only to members of a particular administrative unit.

Figure 11.3 – Assigning an administrative unit

Click Next when you’re finished.

  1. On the Locations page, as shown in Figure 11.4, choose which workloads and locations the policy will be applied to. You can enable all workloads and locations as part of a single policy, with the exception of Power BI. While you can enable devices and on-premises repositories now, those locations will require additional steps to fully onboard and protect. Also, if you are using a new enhanced DLP template for your policy, on-premises repositories aren’t supported.

Figure 11.4 – Adding workloads and locations to the policy

For each location, you can apply filters to include or exclude objects (such as users, groups, sites, or devices). When finished, click Next.

  1. On the Policy settings page, determine what DLP rules you want to apply. You could choose from Review and customize the default settings from the template or Create or customize advanced DLP rules. They both have similar capabilities, though the Create or customize advanced DLP rules option has more flexibility in creating conditions with a more complex editing interface. In this example, you’ll just choose the Review and customize the default settings from the template option, though we’d recommend experimenting with both so you can see the flexibility of the options. Click Next.
  2. On the Info to protect subpage, as shown in Figure 11.5, select Edit to modify the DLP rule conditions:

Figure 11.5 – Reviewing the Info to protect page

Exam Tip
If you have selected the Devices or On-premises repositories location, you will not see or be able to select the Detect when this content is shared from Microsoft 365option. If you have selected SharePoint or OneDrive locations, you will not be able to see or use the User’s risk level for Adaptive protection is control. You’ll have to evaluate what features you need to use and potentially create separate policies to protect data in different locations with different features.

Configuring Scanner Settings – Implementing Microsoft Purview data loss prevention (DLP)

Before you install the scanner, you need to create a scanner cluster configuration object in the Microsoft Purview compliance portal. This cluster configuration will be used to identify scanner clusters in your organization; for example, an organization with multiple geographic locations may opt to deploy scanner clusters at each site.

To create a scanner cluster, follow these steps:

  1. Navigate to the Microsoft Purview compliance portal (https://compliance.microsoft. com) and sign in with an identity that is a member of the Compliance Administrator, Compliance Data Administrator, or Organization Management role.

Exam Tip
The product documentation directs you to the Microsoft Purview compliance portal to set up a scanner cluster, though it doesn’t actually specify where. The option to configure is only visible after assigning the Compliance Administrator, Compliance Data administrator, or Organization Management role and can take up to two hours to display in the portal console after enablement. The compliance portal settings are located at Settings | Information protection scanner. There is also a link at More resources | Azure Information Protection, which redirects you to the AIP blade of the Azure portal (https://portal.azure. com/#blade/Microsoft_Azure_InformationProtection). The steps are nearly identical in either case.

  1. Select Settings and then choose Information protection scanner.
  2. Select the Clusters tab. See Figure 11.11:

Figure 11.11 – AIP clusters page

  1. Click Add.
  2. On the New cluster flyout, enter a name and description. Click Save.

Next, you’ll create a scan job that will be used to discover content located in your on-premises locations.

Configuring Content Scan Jobs
For this task, you’ll need on-premises Universal Naming Convention (UNC) paths or SharePoint site URLs where the content to protect is stored. Once you have collected file paths, you can follow these steps to configure a content scan job:

  1. From the Microsoft Purview compliance portal, selectSettings | Information protection scanner.
  2. Select the Content scan jobs tab.
  3. Select Add to create a new scan job.
  4. Enter a content scan job name.
  5. From the Cluster dropdown, select a configured cluster.
  6. Configure a Schedule (either Manual or Always). Manual scans will need to be initiated via the Start-AIPScan cmdlet on the server or through the portal, while scans set to Always will run as background tasks on the assigned cluster.
  7. Update the Info types to be discovered dropdown to Policy only to detect content based on your already-configured DLP policy settings or All to detect all sensitive information types available in the tenant (including both default and custom sensitive information types).
  8. Scroll the flyout down. Under DLP policy, set the Enable DLP policy rules slider to On.

Figure 11.12 – Configuring content scan job settings

  1. Click Save.
  2. Close the content scan job configuration and then re-open it.
  3. Select the Repositories tab. See Figure 11.13:

Figure 11.13 – Configuring repositories for the scan

  1. Click Add.
  2. On the Repository flyout, add the path and then click Save. See Figure 11.14:

Figure 11.14 – Configuring repository settings

  1. Repeat the process for each repository (file share or SharePoint site) that this scanner cluster will be responsible for checking.

After you have finished configuring all of the repositories for this content scan job, it’s time to start configuring the necessary app registration.