Despite the high rate of adoption for cloud services and infrastructure, many organizations still have
a lot of data stored in on-premises repositories such as SharePoint Server or Windows-based file servers. While cloud-based solutions are great for content stored in the cloud, what options are there for applying those same protections to data that hasn’t been migrated?
The answer is easy: Microsoft Purview Data Loss Prevention!
AIP Scanner Originally branded as the Azure Information Protection scanner in 2018 to help identify sensitive information on-premises, the software has continuously been upgraded with more features. The newest iteration can help support your information protection goals.
Protecting on-premises repositories requires the following tasks to be completed:
• Configuring service accounts • Deploying the AIP Unified Labeling (UL) client to an on-premises server • Configuring the scanner settings • Creating content scan jobs • Creating an Azure app registration • Deploying the AIP scanner to an on-premises server • Configuring a DLP policy that includes on-premises repositories
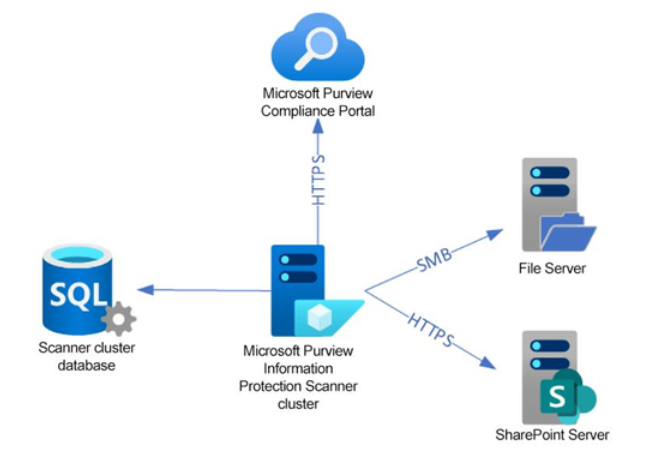
As you can see, there are several pieces involved. Figure 11.9 shows the components in the on-premises DLP deployment:
Figure 11.9 – On-premises DLP architecture
The DLP architecture utilizes one or more on -premises servers configured with the AIP UL client and the AIP scanner. These servers query the DLP policies from the Microsoft Purview compliance portal, store service information in an on -premises SQL database, and are used to discover content in on-premises file shares and SharePoint sites.
Note For production deployments, Microsoft recommends using a full version of SQL Server. For lab environments, you can use SQL Express. To download SQL Express, see https://www. microsoft.com/en-us/Download/details.aspx?id=101064.
Configuring a Service Account For the scanner deployment, you’ll need two accounts—an on-premises account that has access to the file shares and SharePoint document libraries containing content to protect, and either a synchronized or cloud identity that will be used to access the Microsoft 365 service. They can be the same account (this may even make it easier from a deployment perspective). The AIP service does not currently support using a Managed Service Account (MSA) or group Managed Service Account (gMSA).
Deploying the AIP UL client The first step in deploying the Microsoft Purview compliance solution on-premises is to ensure the server(s) you’ll be using have the most recent AIP UL client. Follow these steps to deploy the client:
On the server(s) where you will configure the Microsoft Purview Information Protection Scanner cluster, navigate to https://aka.ms/aipclient to download the client. Either the .msi or .exe download is suitable.
Once it has downloaded, launch the installer.
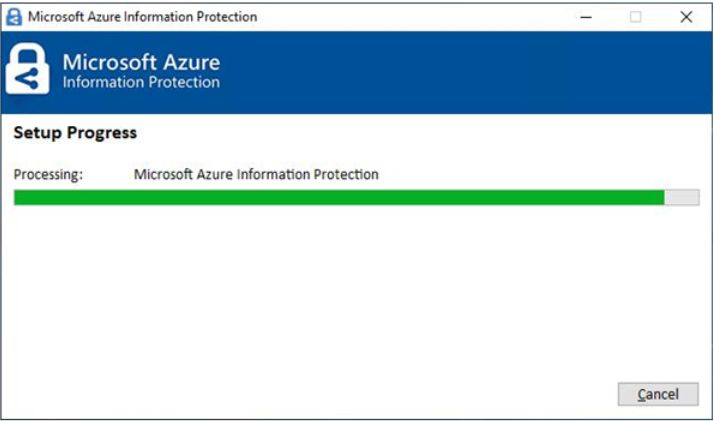
Select I agree to proceed with the installation. Setup begins, as shown in Figure 11.10.
Figure 11.10 – AIP UL client installation
Click Close to exit the installer.
Next, it’s time to move on to the scanner cluster installation.
Viva Insights Teamwork habits, part of the premium Viva Insights experience, allows managers to gain additional recommendations for managing people. Teamwork habits helps managers identify regular after-hours work, meeting overload conditions, and a lack of dedicated focus time.
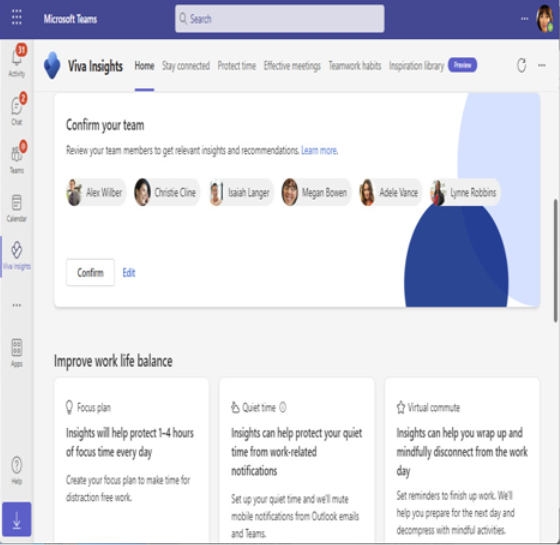
Managers can set up their teams by manually adding users, though they can use the suggested list if the manager property has been configured in Active Directory or Azure Active Directory:
Figure 2.25 – Confirming team members
Three additional core features of Teamwork habits are as follows:
Scheduling recurring 1:1 time with managed employees
Gathering quiet hours impact to determine how work habits impact employees outside of their configured working hours
Shared plans for no-meeting days and shared focus times
Organizations that have the Teamwork habits tools available can improve their employees’ well-being and work-life balance. The Teamwork habits feature requires a separate Microsoft Viva Insights license.
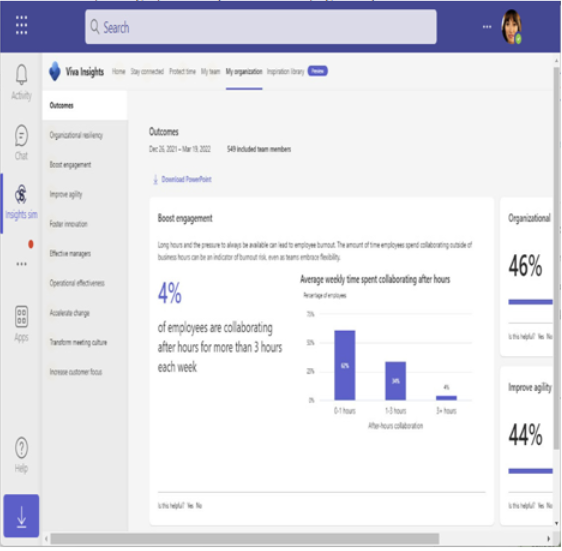
Organization trends
The Organization trends tab shows business leader and manager insights to help understand how to effectively manage your teams, such as identifying work patterns:
Figure 2.26 – Organization trends
Organization trend data is privacy-oriented, requiring a minimum of 10 people (including the manager) to be in the management chain, either directly or indirectly. In addition, access to organization trends requires granting access to manager insights through the Viva setup.
Advanced insights
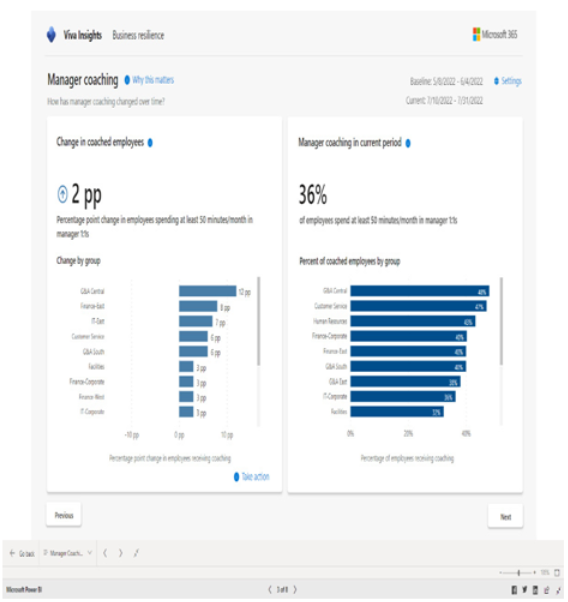
Microsoft Viva Advanced Insights is a reporting tool that provides research-based behavioral insights into organizational work patterns, such as hybrid work, work-life balance, and employee well-being.
The Advanced Insights reporting tool comes with several built-in templates and analysis tools to help organizations understand everything, from meeting effectiveness to employee performance trends correlated to manager 1:1 meetings:
With large organizational changes such as hybrid and remote work scenarios, it can be important to understand how those work patterns affect performance, including interesting data points such as how much time is spent during meetings multitasking, or how much work is getting done outside normal business hours:
Figure 2.28 – Advanced insights working hours details
The Advanced Insights Power BI report templates provide an analysis of employee engagement and work patterns. Here are the reports:
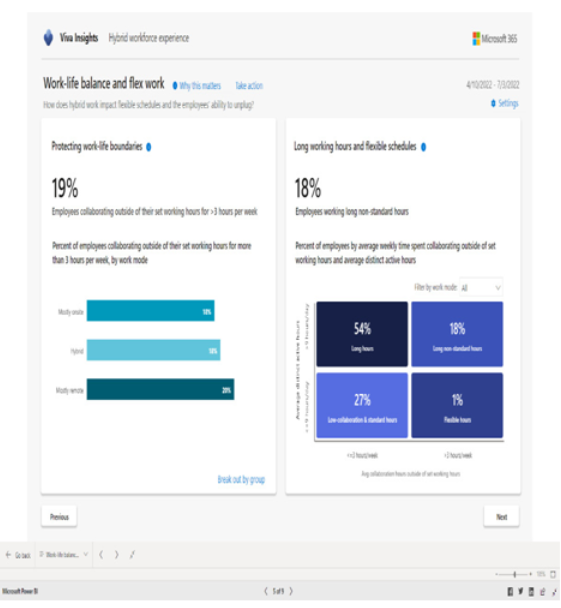
Business resilience: Overall business report highlighting performance and employee well-being
Hybrid workforce experience: This report highlights how different work modes (onsite, hybrid, and remote) affect workers
Manager effectiveness: This report provides insight into patterns for people managers
Meeting effectiveness: This report captures and displays information on meeting statistics such as how many meetings happen at short notice or how much multitasking occurs during meetings
Ways of working: This data helps answer questions such as, “Are employees receiving enough 1:1 coaching time?” and “Who generates the most work by organizing meetings?”
Wellbeing – balance and flexibility: This reporting data is used to identify whether employees have enough time to focus on core priorities and balance that with breaks and time away from work
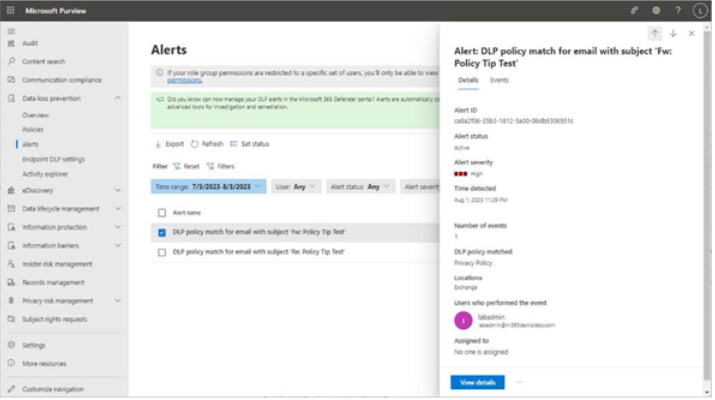
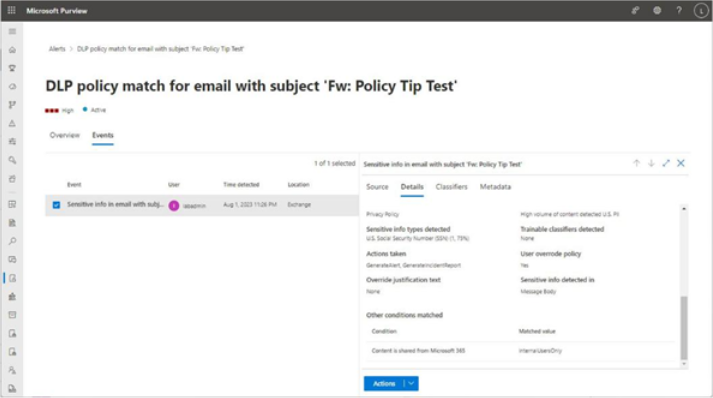
The easiest place to view DLP alerts is on the Alerts dashboard, located in the Microsoft Purview compliance portal under Data loss prevention. Figure 11.26 depicts an alert that was generated based on a DLP policy using a template to detect personal information, such as social security numbers:
Figure 11.26 – Viewing a DLP alert
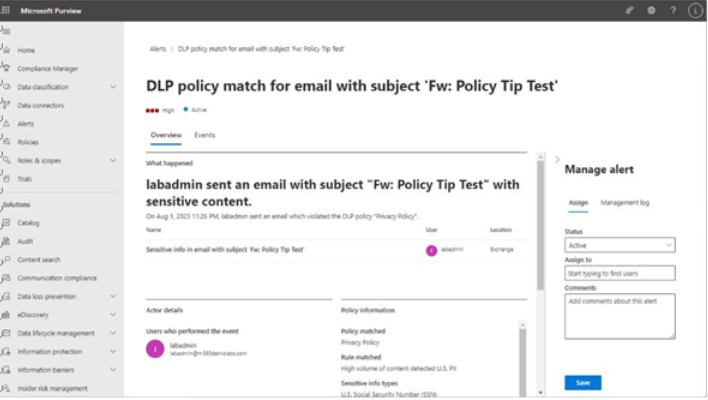
You can view more details about the alert by selecting the View details button at the bottom of the flyout. The detail view of an alert displays a number of fields on the Overview tab, such as a plain-text summary of the event, actor details (who did it), the policy that was matched, and the corresponding rule and sensitive information types inside the rule, basic information about the alert, such as the severity and time detected, as well as other alerts related to the user or actor. See Figure 11.27:
Figure 11.27 – Alert detail page
On the Manage alert pane, you can update the status of a particular DLP event. When first detected, the alert is set to Active. You can select additional statuses such as Investigating, Dismissed, or Resolved. Updating the status in the Alerts dashboard to Investigating will set the corresponding event’s status to In Progress in the Microsoft 365 Defender incident. Updating the alert status to either Dismissed or Resolved will set the corresponding event’s status to Resolved in the Microsoft 365 Defender incident.
Note While setting the alert’s status to Dismissed or Resolved in the compliance portal will update the alert’s status to Resolved in the Microsoft 365 Defender portal, setting an alert’s status to Dismissed will also result in the classification in Microsoft 365 Defender being set toFalse positive.
Selecting the Events tab on the alert detail page will show much of the same information but arranged in a different order. New data presented, however, includes additional information about actors and intended recipients, classifiers or sensitive info types used to match content, and the context of the data inside the file or message that triggered the alert.
If you’ve configured a policy to allow user override and the user exercised that option, you can see that data here as well, along with any business justification text that was submitted, as shown in Figure 11.28:
Figure 11.28 – Event detail view of an alert
If you have configured encryption for the items matching the DLP policy, the Source tab may display a warning that the content is encrypted, prompting you to download the file or message in order to view it. However, the Classifiers tab will show examples of content that matches the policy rules. It’s important to only delegate compliance-related roles to individuals your organization trusts to address issues arising from viewing potentially sensitive information. The Metadata tab will show the underlying data for the policy match conditions and will also include the matched content values.
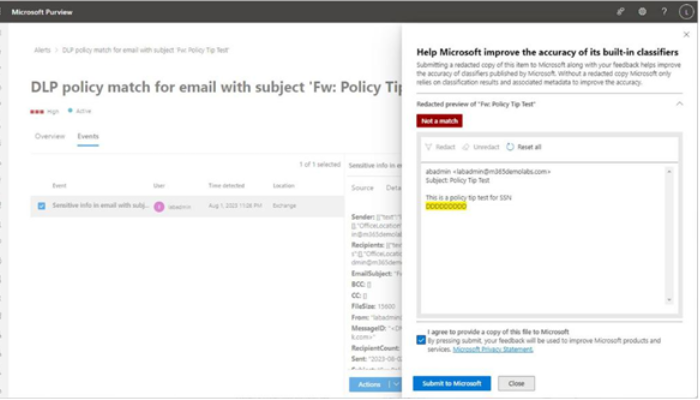
On the Actions tab for an event, you can choose to download the item or mark it as Not a match.
If you select Not a match, you have the option of submitting a redacted sample to Microsoft to help improve the accuracy of scan detections. See Figure 11.29:
Figure 11.29 – Submitting a redacted false positive sample to Microsoft
While this section specifically covers the DLP view of the Alerts dashboard, the broader compliance portal Alerts view is the same but also includes compliance events from sources besides DLP. The management tasks, item details, and interfaces are the same.
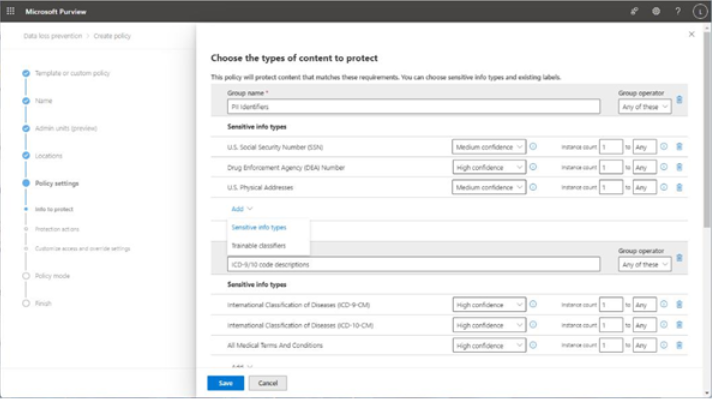
When editing the DLP content matching rules, you can add sensitive information types and trainable classifiers to groups, as well as adjust the confidence and instance count requirements. By default, objects are joined with OR conditions (Any of these), but you can also set the join criteria to AND (All of these) to create more stringent requirements for detecting data. See Figure 11.6:
Figure 11.6 – Editing a DLP match rule
Additional rule settings that you can modify from this page include alert notifications as well as allowing or prohibiting override conditions. If configuring aggregated alert thresholds, you can select the Send alert when the volume of matched activities reaches a threshold radio button and then set numeric values corresponding to the minimum number of instances or detections to trigger an alert and what the monitored time period is.
Click Save once you’ve finished editing the rule conditions.
On the Info to protect subpage, click Next.
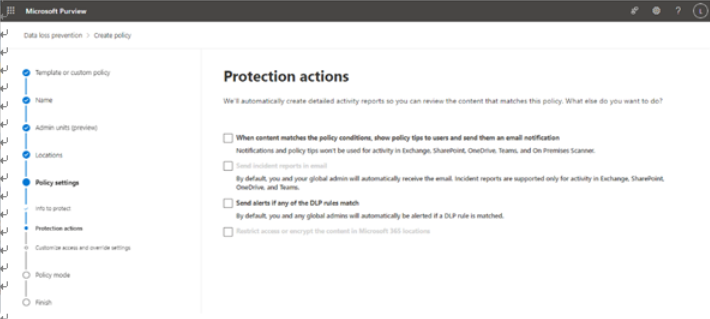
On the Protection actions page, as shown in Figure 11.7, determine which options to enable.
Exam Tip If you are customizing a default policy template (as opposed to creating an advanced DLP rule), you will not be able to select Restrict access or encrypt the content in Microsoft 365 locations. That feature is only configurable inside an advanced DLP rule at this time.
Figure 11.7 – Configuring protection actions
For any of the supported options, you can customize the policy tip, email, and alert notifications. When you’re finished, click Next.
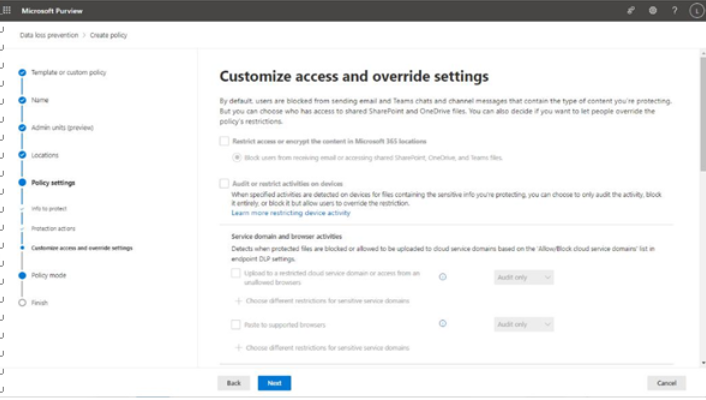
On the Customize access and override settings subpage, as shown in Figure 11.8, edit any options. You may not be able to select options on this page depending on what locations or other options have selected. Auditing or restricting activities on devices, for example, is only available if you have the Devices location enabled for the policy.
Figure 11.8 – Customize access and override settings
On the Policy mode page, choose the setting for policy enablement. You can choose Test it out first (sometimes referred to as Audit mode), Turn it on right away, or Keep it off. Click Next when you’re finished.
On the Finish page, review the policy settings. Edit them if necessary, and then click Submit to configure the policy.
After choosing to turn on a policy, it may take up to an hour to be enforced across your tenant.
Power BI DLP for Power BI includes many of the same features as standard policies, with the following exceptions and caveats:
• When creating a policy, you can only select the Custom category and policy template. • You can only select the Power BI location in the policy. You cannot configure other locations in the same policy. • DLP actions are only supported in workspaces hosted in Premium capacities. • You cannot use trainable classifiers to identify data.
All other features and capabilities are supported.
Label policies are on the client side and work inside applications such as Outlook and Word and in the web user interfaces for SharePoint, OneDrive for Business, and Power BI. Label policies can be made available to users via administrative units or to individual users and groups. Additionally, label policies can be made mandatory—that is, users are required to choose from the published labels to apply to content in the Office apps, documents, meetings, and Power BI content.
The wizard to publish label policies can be activated after a label has been created, or separately.
In the following example, you’ll look at creating a label policy for an existing label:
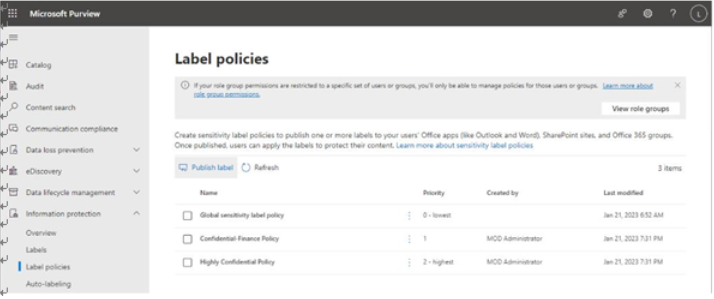
In the Microsoft Purview compliance portal (https://compliance.microsoft.com), expand Information protection and select Label policies.
Click Publish label, as shown in Figure 10.46:
Figure 10.46 – Publishing a label
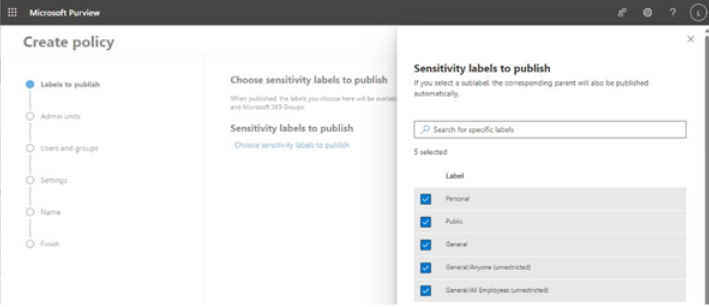
On the Labels to publish page, as shown in Figure 10.47, click Choose sensitivity labels to publish and then select the labels to publish from the list. Click Add to add the labels to the list of labels that will be published as part of the policy. Click Next to continue.
Figure 10.47 – Selecting labels to publish
On the Admin units page, choose which administrative units to use for scoping the policy. By default, the entire tenant is selected. Click Next.
On the Users and groups page, select which users or groups will receive the label policy. By default, all users and groups are included. Click Next.
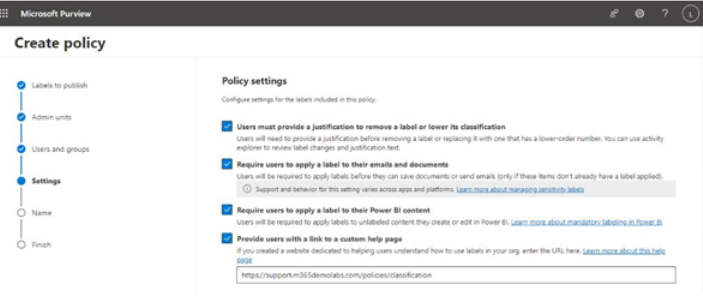
On the Settings page, choose the appropriate settings to apply to this policy. You can choose from Users must provide a justification to remove a label or lower its classification, Require users to apply a label to their emails and documents, Require users to apply a label to their Power BI content, and Provide users with a link to a custom help page. Click Next.
The Users must provide a justification to remove a label or lower its classification option has no additional configuration options, but users will have to enter classification text (which will be logged) when changing the label. Lowering a classification corresponds to its priority on the Label policies page.
The Provide users with a link to a custom help page option has only a single configuration field—a URL—which must be specified on this page.
Figure 10.48 – Configuring policy settings
On the Documents page, if you want to specify a default label, select it from the list of labels. The default label will be applied to the label automatically, though the user can select a different label from their available labels if the sensitivity of the content warrants a change. Click Next.
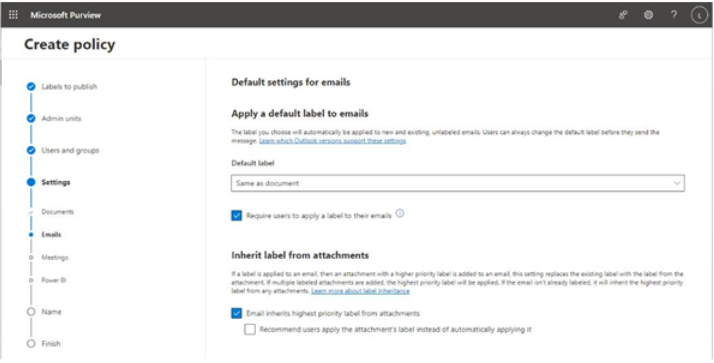
On the Emails page, select Default label (you can choose Same as document) to choose the same label as you selected on the Documents page or one of the other available labels. It’s recommended to choose the Same as document label to help users avoid confusion and ensure consistency. If you selected Require users to apply a label to their emails and documents on the Settings page, you can choose Require users to apply a label to their emails on this page. You can also choose the Email inherits highest priority label from attachments option if you want an attachment’s assigned label to be able to potentially override an email label’s priority.
Figure 10.49 – Configuring email settings
Click Next.
If your organization requires labeling of all items (including calendar items), you have options for managing label application on the Apply a default label to meetings and calendar events page. You can choose a default label as well as the Require users to apply a label to their meetings and calendar events option (if the Require… checkbox was selected on the Settings page). If you don’t have a reason to require labeling of calendar invitations, leave the setting cleared. Click Next.
On the Power BI page, you can choose a default label that will be applied to Power BI content. Organizations that have mandatory classification requirements should configure this option to help ensure compliance. For the exercise, select one of the labels that you have configured and click Next.
On the Name page, enter a Name value for the label policy. Click Next.
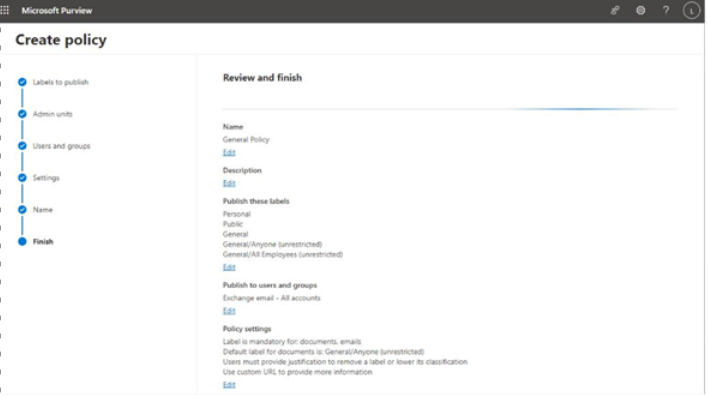
On the Finish page (depicted in Figure 10.50), review the settings and click Edit to change them if necessary, or click Submit to finish creating the policy.
Figure 10.50 – Reviewing the final settings
After you’ve configured the label publishing policy, the labels will show up for use in application and user interfaces.
Before you install the scanner, you need to create a scanner cluster configuration object in the Microsoft Purview compliance portal. This cluster configuration will be used to identify scanner clusters in your organization; for example, an organization with multiple geographic locations may opt to deploy scanner clusters at each site.
To create a scanner cluster, follow these steps:
Navigate to the Microsoft Purview compliance portal (https://compliance.microsoft. com) and sign in with an identity that is a member of the Compliance Administrator, Compliance Data Administrator, or Organization Management role.
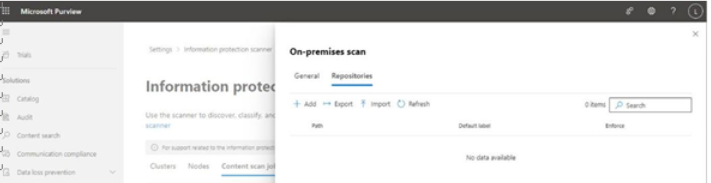
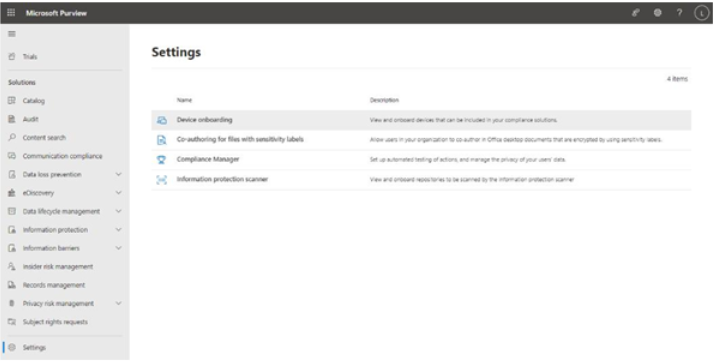
Exam Tip The product documentation directs you to the Microsoft Purview compliance portal to set up a scanner cluster, though it doesn’t actually specify where. The option to configure is only visible after assigning the Compliance Administrator, Compliance Data administrator, or Organization Management role and can take up to two hours to display in the portal console after enablement. The compliance portal settings are located at Settings | Information protection scanner. There is also a link at More resources | Azure Information Protection, which redirects you to the AIP blade of the Azure portal (https://portal.azure. com/#blade/Microsoft_Azure_InformationProtection). The steps are nearly identical in either case.
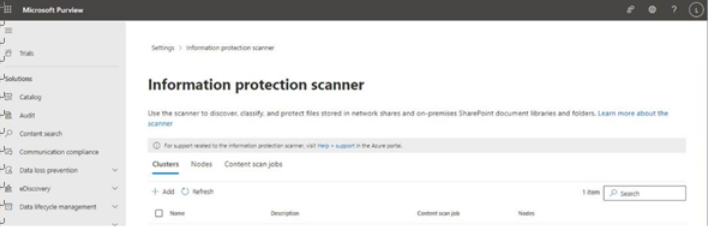
Select Settings and then choose Information protection scanner.
Select the Clusters tab. See Figure 11.11:
Figure 11.11 – AIP clusters page
Click Add.
On the New cluster flyout, enter a name and description. Click Save.
Next, you’ll create a scan job that will be used to discover content located in your on-premises locations.
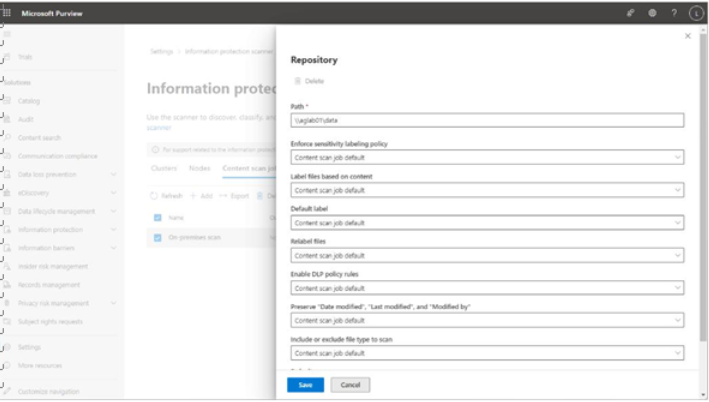
Configuring Content Scan Jobs For this task, you’ll need on-premises Universal Naming Convention (UNC) paths or SharePoint site URLs where the content to protect is stored. Once you have collected file paths, you can follow these steps to configure a content scan job:
From the Microsoft Purview compliance portal, selectSettings | Information protection scanner.
Select the Content scan jobs tab.
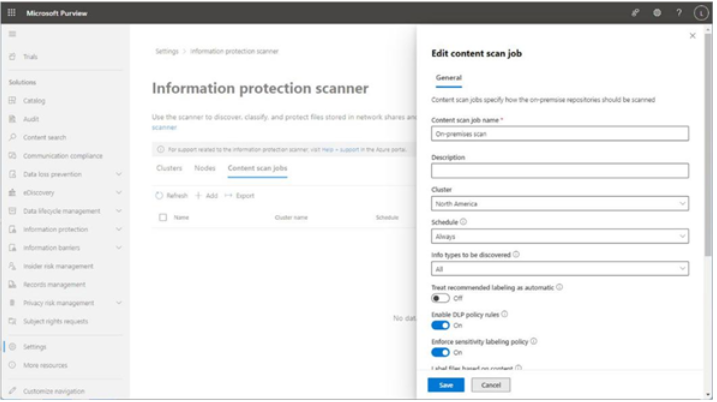
Select Add to create a new scan job.
Enter a content scan job name.
From the Cluster dropdown, select a configured cluster.
Configure a Schedule (either Manual or Always). Manual scans will need to be initiated via the Start-AIPScan cmdlet on the server or through the portal, while scans set to Always will run as background tasks on the assigned cluster.
Update the Info types to be discovered dropdown to Policy only to detect content based on your already-configured DLP policy settings or All to detect all sensitive information types available in the tenant (including both default and custom sensitive information types).
Scroll the flyout down. Under DLP policy, set the Enable DLP policy rules slider to On.
Once you’ve got the AIP UL client deployed, the scanner settings configured, and the app registration details, you can begin installing scanner cluster nodes in your on-premises environment. You’ll need the name of the scanner cluster that you created in the Microsoft Purview compliance portal to complete this task, as well as a service account that will be used to run the local service.
To install and configure the scanner service, follow these steps:
On a server that you wish to use to deploy the scanner, launch an elevated PowerShell session.
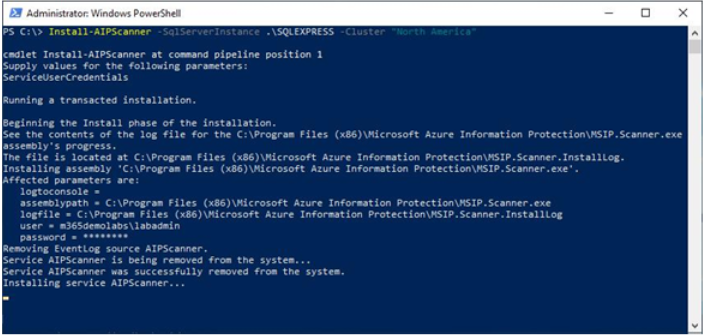
From the elevated prompt, run the following command:
Install-AIPScanner -SQLServerInstanceName -Cluster For example, if you deployed a local SQLExpress database instance and are using a scanner cluster called North America, you could enter the following: Install-AIPScanner -SQLServerInstanceName .\SQLExpress -Cluster “North America” See Figure 11.19:
Figure 11.19 – Starting the AIP scanner installation
When prompted, enter the service account credential that will be used.
Wait for the configuration to be completed.
Figure 11.20 – Installing the AIP scanner
In the elevated PowerShell console on the server where the AIP scanner was installed, run the following command:
Once the scanner has been registered with the cluster, the content scan you configured will start. You can then use the on-premises repository location as part of a DLP policy.
Next, you’ll shift to managing Endpoint DLP. Implementing Endpoint DLP To this point, you’ve been working with managing DLP capabilities for content that is stored in the Microsoft 365 service or moving across the Microsoft 365 ecosystem—through applications such as Exchange Online and SharePoint Online.
But what if the data is created or stored on an endpoint device? Can organizations use the same types of DLP technology to protect and alert on activities with that data?
Yes! Microsoft’s Endpoint DLP can do exactly this! Some of the features of Endpoint DLP include the following:
• Restricting application access to sensitive data • Automatically quarantining content being accessed from restricted apps • Preventing protected files from being transferred via Bluetooth • Preventing certain browsers from accessing protected content • Preventing browsers from uploading to restricted domains • Restricting the transfer of protected content to USB storage devices • Restricting printing
Many organizations—especially those that deal with confidential information—need to be able to protect data against unauthorized storage and use. Endpoint DLP is a great solution to help achieve that.
Further Reading For a complete list of monitored activities, see https://learn.microsoft.com/en-us/microsoft-365/compliance/endpoint-dlp-learn-about?view=o365-worldwide#endpoint-activities-you-can-monitor-and-take-action-on.
• In addition to preventing certain types of activities, endpoint DLP also monitors activities across a wide variety of files on both Windows and macOS platforms. Out of the box, endpoint DLP monitors documents (.doc, .docx, etc.), spreadsheets (.xls, .xlsx, etc.), archive files (.zip, .tr, etc.), and presentations (.ppt, .pptx, etc.), regardless of whether a policy is configured to monitor or act on them. Endpoint DLP can even be integrated with Azure Optical Character Recognition (OCR) to scan PDF images, JPGs, and other image files.
What’s in a Name? Endpoint DLP supports documents and files based on their Multipurpose Internet Mail Extension (MIME) type, so changing a file’s extension name won’t affect whether Endpoint DLP is able to capture audit log data or enforce a policy against it.
Endpoint DLP has two requirements: a supported operating system and a supported subscription. Endpoint DLP can be enabled for Windows 10, Windows 11, and macOS 10.5 or later devices and requires one of the following subscriptions:
• Microsoft 365 E5/A5/G5 • Microsoft 365 E5/A5/F5/G5 Compliance and F5 Security & Compliance • Microsoft 365 E5/A5/F5/G5 Information Protection & Governance
With those requirements out of the way, let’s go through the onboarding process. Since endpoint DLP builds on the Microsoft Defender for Endpoint(MDE) product, it can be onboarded using a variety of methods (Intune, Group Policy, Configuration Manager, and scripts). Microsoft’s best practice for organizations using the entire Microsoft 365 suite is to use Intune to deploy and configure policies.
Note If using Intune to deploy endpoint DLP, the devices must be Intune enrolled.
If you’ve already got MDE onboarded, the next step is to onboard the devices into the Microsoft Purview compliance portal. To configure onboarding through Purview, follow these steps:
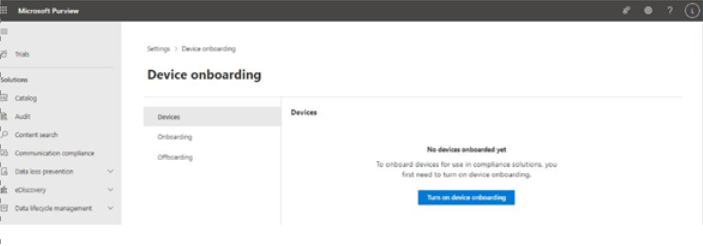
Navigate to the Microsoft Purview compliance portal (https://compliance.microsoft. com) and select Settings | Device onboarding. See Figure 11.21:
Figure 11.21 – Device onboarding
In the middle pane, select Devices and then select Turn on device onboarding in the main window.
Figure 11.22 – Turning on device onboarding
Acknowledge the prompt that existing MDE devices will be automatically onboarded by clicking OK.
Click OK to acknowledge that device monitoring has been turned on.
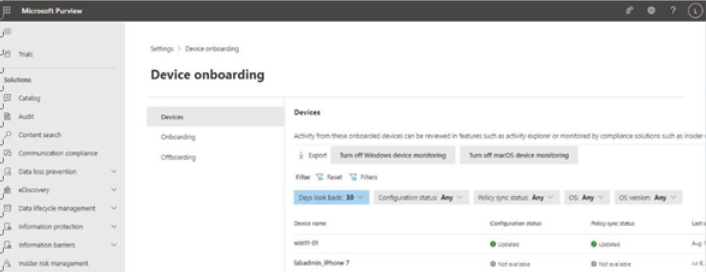
That’s it! That’s all it takes. You can view the status for devices on the Devices tab of the Device onboarding page, as shown in Figure 11.23:
Figure 11.23 – List of onboarded devices
The Configuration status column will show that the device has received the updated onboarding configuration. The Policy sync status column will show whether DLP policies have been synchronized to the device.
The policy sync status can take up to two hours to show up, so you may need to be patient. You can attempt to trigger the policy application to come down sooner using the Resync button in the Intune management portal (Devices | Windows devices or macOS devices | Overview) or by restarting the device itself.
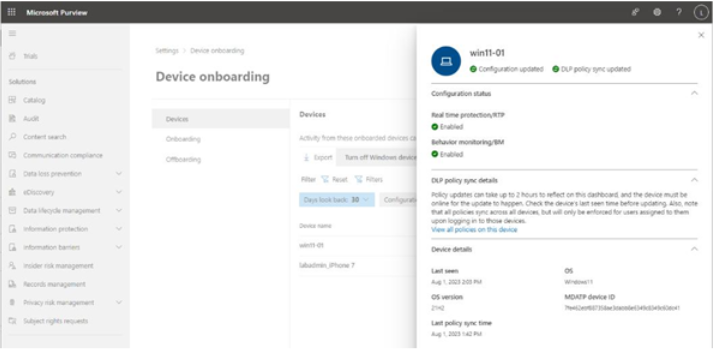
After the policy refresh cycle has completed, when you select an onboarded device from the Settings | Device onboarding | Devices page, you can see which device DLP policies have been synchronized, as shown in Figure 11.24:
Many workloads and services in the Microsoft 365 platform support DLP capabilities. DLP detects content based on a variety of mechanisms, such as keywords, built-in functions, and secondary matches that are located in proximity to the primary matched content. Microsoft Purview DLPcan also use document fingerprinting and machine learning algorithms to detect content.
Depending on the workload or application, DLP policies can take the following actions on detected content:
Display a notification (called a policy tip) that warns the users about sensitive content
Block sharing with or without the ability for the end user to override the block
Move sensitive items to a quarantine location
Prevent sensitive content from being displayed in a Teams chat
Encrypt content
DLP, from the workload perspective, can be applied to data in transit, data at rest, and data in use. In the following sections, you’ll review configuring DLP settings for the Exchange Online, SharePoint, OneDrive for Business, Teams, and Power BI workloads, as well as an overview of protecting on-premises file shares with the Azure Information Protection (AIP) scanner.
Prerequisites
DLP has license subscription requirements. Depending on the workload to be protected, users need one of the following licenses:
Microsoft 365 E3/A3/A5/E5/A5/G5
Microsoft 365 Business Premium
SharePoint Online Plan 2
OneDrive for Business Plan 2
Exchange Online Plan 2
• Microsoft 365 E5/A5/F5/G5 Compliance and F5 Security & Compliance • Microsoft 365 E5/A5/F5/G5 Information Protection & Governance
In addition, DLP for Microsoft Teams (chat and channel messages, in particular) and on-premises repositories requires one of the following licenses:
• Microsoft 365 E5/A5/G5
• Microsoft 365 E5/A5/F5/G5 Compliance or F5 Security & Compliance
• Microsoft 365 E5/A5/F5/G5 Information Protection & Governance
In order to configure DLP policies, you must be a member of one of these role groups:
Compliance Administrator
Compliance Data Administrator
Information Protection
Information Protection Admin
Security Administrator
Organizations with any eligible subscription with DLP features (such as E1, F1, G1, A3, E3, G3, A5, E5, or G5) can create DLP alerts that are triggered on every matching activity.
Organizations with an A5, E5, or G5 subscription or an Office 365 Advanced Threat Protection Plan 2, Microsoft 365 E5 Compliance, or Microsoft 365 eDiscovery and Audit add-on license can configure aggregated alerts—meaning that DLP alerts will only show up based on a certain threshold.
With that being said, let’s look at configuring some workload policies!
Configuring Workload Protection
In this section, you’ll walk through configuring workload protections at a high level using built-in templates.
The AIP scanner application requires an Azure app registration in order to obtain a token from Azure for interacting with the Azure Information Protection service endpoint. To configure this registration, you’ll need to follow these steps:
Navigate to the Azure portal (https://portal.azure.com). Select Azure Active Directory (or Microsoft Entra ID) and then click App registrations.
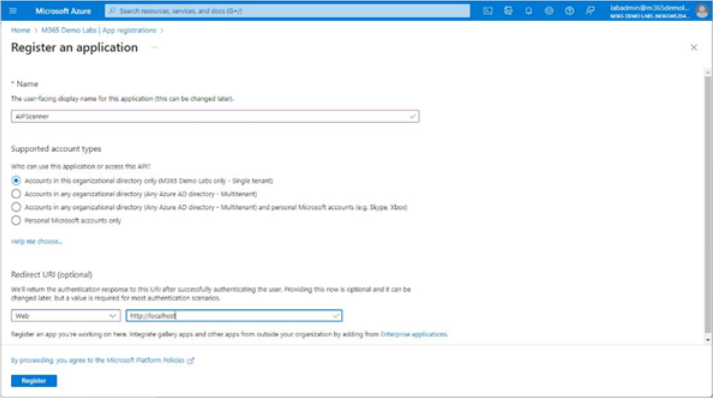
Select New registration.
Enter a name, such as AIPScanner.
Under Redirect URI, select the platform as Web and enter http://localhost in the text box. See Figure 11.15:
Figure 11.15 – Configuring an app registration
On the app’s Overview page, copy the Application (client) ID and Directory (tenant) ID values to a temporary storage location.
Select Clients & secrets.
Click New client secret.
On the Add a client secret flyout, add a description and set an Expires date value of at least a year. Click Add.
After the secret has been created, copy the Secret ID value to the temporary storage location containing the App ID and Directory ID values. These values will be used in the next section.
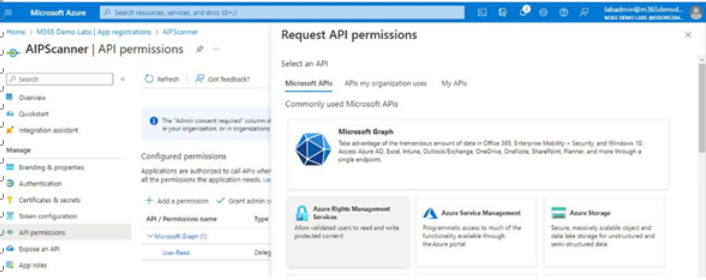
On the API permissions page, select Add a permission.
On the Request API permissions flyout, select the Microsoft APIstab. Select Azure Rights Management Services. See Figure 11.16:
Figure 11.16 – Adding permissions on the Request API permissions flyout
Select Application permissions.
Expand the dropdown for Content. Select the Content.DelegatedReader and Content. DelegatedWriter checkboxes. Click Add permissions.
Under Manage, select API permissions and then select Add a permission.
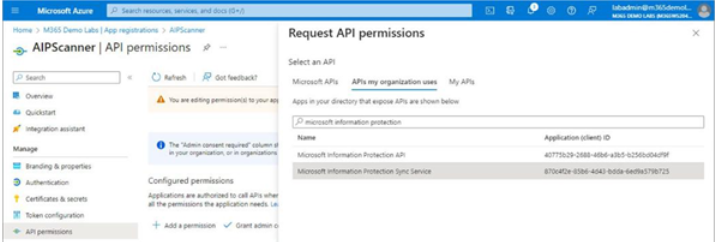
On the Request API permissions flyout, select the APIs my organization uses tab.
Locate the Microsoft Information Protection Sync Serviceentry and select it. See Figure 11.17:
Figure 11.17 – Choosing the Microsoft Information Protection Sync Service API
Select Application permissions.
Select the checkbox for the UnifiedPolicy.Tenant.Read permission. Select Add permissions.
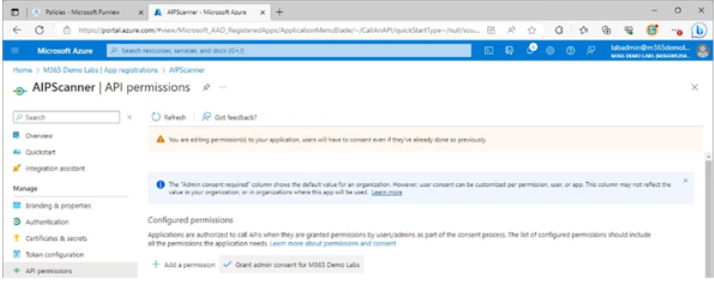
On the API permissions page, click Grant admin consent for . See Figure 11.18:
Figure 11.18 – Granting admin consent
Click Yes to confirm.
With your app registration and client secret details in hand, it’s time to install and configure the actual AIP scanner.